Apricot Chicken and Balsamic Broiled Brussels Sprouts

P1040983

This chicken recipe is a favorite from Simply in Season, a fantastic recipe book with recipes organized by what produce is in season. (If you want to do even more good as you cook seasonally and sustainably, buy it from Ten Thousand Villages, and support another good cause!) The Brussels sprouts recipe is a winner from my aunt, who even got my dad to like them! A rare success!

Apricot Chicken

Ingredients:

– 2 tsp butter
– 4 ripe apricots, pitted and halved
– 4 boneless, skinless chicken breasts
– salt and pepper
– olive oil
– 1 tsp ginger root, minced
– 1 green onion or 2 tbsp onion, chopped
– 1/2 cup dry white wine (or substitute with apple juice or water)
– 2 tbsp honey or maple syrup
– 1/2 tsp grated lime peel (or a dash of lemon juice)

Instructions:

1) Melt butter in a frying pan. Place apricots in melted butter, cut side down, and cook over medium heat until light brown, about 5 minutes. Turn and cook several minutes more. Remove to plate.

2) Salt and pepper the chicken on both sides. Add 1 tbsp olive oil (or as needed) to pan, and saute chicken on medium-high heat for 3 minutes, then medium-low heat for 7 more minutes or until no longer pink inside. Remove chicken to plate.

3) Add ginger and onions to frying pan and saute briefly. Return chicken and apricots to pan, and add white wine, honey, and lime peel. Simmer 10 minutes to combine flavors. Serve alone, or over brown rice or cous cous.

.          .          .

Balsamic Broiled Brussels Sprouts

Ingredients:

– about 1 1/2 lb brussels sprouts, halved

– 1/4 cup olive oil

– 1/8 cup balsamic vinegar

– 1 1/2 tsp coarse salt (kosher or sea salt)

– 1/2 tsp ground pepper

Instructions:

1) Preheat oven to 400 degrees.

2) Combine all ingredients in a bowl, and mix until evenly coated.

3) Spread on a a baking sheet (lined with parchment paper if you have it, this makes it easier to clean later!). Pour any dressing remaining in the bowl over the brussels sprouts.

4) Roast for 20-30 minutes. Toss once at about 15 minutes to ensure even cooking. When done, brussels sprouts will be browned and tender, and slightly crispy at the edges.

The Best Basic Pizza Crust

I recently found the best pizza crust recipe ever. It instantly replaced my prior attempts, because of it’s ease, it’s crispiness, lightness, and doughiness. In my (humble, inexperienced pizza maker’s) opinion, it’s the full package. The photo below is from my first attempt, which turned out perfectly in spite of my minor deviations from the recipe. It’s a pretty forgiving dough, I’ve found. Enjoy!

Pesto-Asparagus White Pizza

Todd English’s Pizza Dough Recipe

(Recipe from The Figs Table. For the original recipe, see here. I’ve made some adjustments to the instructions, based on what I’ve found to be easiest for the inexperienced pizza maker, ie. me.)

Ingredients:

– ¼ cup whole wheat flour
– 3½ cups all-purpose flour, plus additional for rolling
– 2 teaspoons kosher salt
– 1 2/3 cups lukewarm water
– 2 teaspoons sugar
– 2 teaspoons active-dry yeast
– 2 teaspoons olive oil

Instructions:

  1. Mixing: Stir the flours and salt together in a large bowl. In a small bowl, combine the water, sugar and yeast in and let sit for five minutes, until the mixture bubbles slightly. Add the olive oil and stir. Gradually (in 3-4 parts) add the oil-water mixture into the bowl, and knead until the dough is firm and smooth. (*1)
  2. Rising: Divide the dough into two to four balls, depending on how large of a pizza you’d like to make (*2).  Place dough balls on lightly-oiled parchment paper (*3), with enough room for dough to roughly double in size. Lightly rub the dough with olive oil, then cover loosely with plastic wrap. Let the dough rise in a warm spot for about two hours. (If you want to freeze all or some of the dough, do this now. See below, *4.)
  3. Rolling: Dab your fingers in flour and then place one ball on a plain sheet of parchment paper (NOT floured or oiled). Press down in the center with the tips of your fingers, spreading the dough with your hand. Gradually work your way out, until you have flattened the dough out from the center to the edge, roughly the thickness of a flatbread. The outer edge should be a little thicker than the inner portion.
  4. Topping: top as desired. (Read on for the toppings for the pizza pictured above.)
  5. Baking: Preheat oven to 500 degrees. If you are using a baking stone, preheat with the stone in the oven. Transfer the pizza-on-parchment paper to the stone by holding the edges of the parchment paper. If you are not using a baking stone, simply slide the pizza-on-parchment paper onto a baking sheet and transfer to the oven. Bake for 10 minutes, until crust is lightly browned and cheese is melted.
  6. Eating: Forks and knives, hands, sandwich method. All’s fair in love, war, and pizza.

Notes from Erin:

(1) The dough will be very wet and sort of difficult to work with. Fact of life, it will stick all over your hands. This is how it’s supposed to be. No worries.

(2) The pizza shown below used half of a recipe of dough, and fed 3 people. A quarter recipe makes more of an individual-size pizza, enough to feed 1-2 people, depending on how hungry the people are and/or how delicious the topping is.

(3) A quick once-over with cooking spray easily does the trick.

(4) To freeze: This is a freezer-friendly recipe. After the initial 2-hour rise, punch down the dough and wrap in plastic, then place in a zip-lock in the freezer. When ready to use, let sit at room temperature for at least 2 hours, then proceed with rolling and baking.

(5) Rolling the dough on parchment paper makes rolling and transferring so much easier. The dough will stick to the paper, making it easier to roll because it won’t keep shrinking down on you. To transfer to the oven, move the pizza simply by picking up the parchment paper. And don’t worry about sticking; after baking the pizza will pop cleanly off the parchment paper.

And now for one delicious option for toppings:

Erin’s Pesto-Asparagus White Pizza

  1. Cut one chicken breast into bite-sized pieces, and fry in olive oil with salt and pepper to taste. (Optional; omit for vegetarian pizza.)
  2. Remove chicken from pan, and in remaining oil fry 1/4 of an onion, thinly sliced.
  3. Trim the ends off 8 stalks of asparagus, and cut stalks in thirds. Blanch in salted boiling water for 2 minutes, then drain and rinse in cold water. Pat dry with a clean towel.
  4. Roll dough from 1/2 recipe of pizza dough. Spread 6 heaping tablespoonfuls of pesto sauce over pizza, or more as desired, so that pizza is covered with a thin layer of pesto sauce.
  5. Evenly spread asparagus, chicken, and onions over the top.
  6. Top with 1/2 of a ball of fresh mozzarella cheese, sliced into thin rounds.
  7. Bake per instructions above.

P-B-M Grilled Chicken Sandwiches

Erin's P-B-M Grilled Chicken Sandwich

Everyone’s heard of a T-B-M, one of the greatest things America has co-opted and subsequently abbreviated  from foreign cuisine. But few have heard of the P-B-M: the Pineapple-Basil-Mozzarella Chicken Sandwich.

Don’t write it off too quickly; though it sounds weird, I promise that it is fantastic!

This recipe was added to my recipe book when I first made it for a group of friends on a spring break trip to Florida in college. I’m lucky enough to still be living with my college roommate, and in spite of all odds to still be friends with her to boot, so when her birthday rolled around this was her birthday dinner request.

Erin’s P-B-M Grilled Chicken Sandwich

Ingredients: (for two people)

– one chicken breast, halved (height-wise, so that each breast has the normal surface area, but half the thickness)
– two rounds of pineapple, cut about 1/2 inch thick, cored and quartered.
– 2 sprigs of fresh basil
– 1 lime, quartered
– 1 ball of fresh mozzarella
– salt and pepper, to taste
– olive oil
– 2 rolls or buns (I used pretzel rolls, my favorite!)

Instructions:

1) Brush the chicken breast halves with olive oil, salt, and pepper to taste. Grill (or saute) the chicken. When it is mostly cooked squeeze the juice from one quarter of the lime over each breast, then finish cooking.

2) Serve on bun, and squeeze juice from one more quarter of lime over the chicken if desired. Top with mozzarella, pineapple, and basil.

Sweet n’ Spicy Sriracha Salad Dressing, and Erin’s Asian Salad

As summer heats up, my oven cools down – it is just too hot to warm up my small apartment even more by baking. This is a delicious summer meal that is refreshing wherever you eat it, and is my go-to for picnics and cook-outs. This also was a regular meal during the days of the Great Greens (aka “That time when Erin had way too much produce”). Luckily it is delicious, so I never tired of it!

Erin’s Sweet n’ Spicy Sriracha Peanut Salad Dressing

– 1/2 cup canola oil
– 2 tsp sriracha
– 1 tbsp honey
– 1/2 tbsp soy sauce
– 2 tsp lemon juice
– 2 tbsp natural* peanut butter

Combine and stir with a fork.

* Preferred: unhomogenized peanutbutter. If you only have homogenized peanut butter, like Skippy, cut back on the honey and use a food processor or blender to combine.

Erin’s Kick-ass Asian Salad

Ingredients:

– 1 lb lettuce (your preferred type, or a mixture)
– 1/2 bunch of fresh cilantro
– 8 hard boiled eggs, chopped into chunks
– 1 1/2 cup of Erin’s Cucumber-Apple Pickles
– Erin’s Sriracha Salad Dressing

Instructions:

Wash, tear, and toss lettuce in a large bowl. Tear cilantro leaves off stems, add to bowl, and toss. Top with pickles, egg, and dressing.

Erin's Asian Salad

Cucumber-Apple Fresh Pickles

If the word “pickle” has you ducking and running, hang with me for a second! I promise I’m not from Portlandia. This isn’t what you think it is – there is no canning involved. These are refrigerator pickles, which means that you throw everything together, toss it is a jar, and chuck it in the fridge overnight. Done.

We Can Pickle That

Not only is this recipe easy, it is delicious – the apple and apple cider vinegar gives it a sweet flavor that is unlike the almost sickening sweetness of some of your average sweet pickles, and the ginger and red pepper gives it a wonderful Asian-influenced kick.

Need me to sell it more? Use these on pretty much anything you’d make at a summer cook-out: on bratwurst with ketchup and a dollop of roasted onions, on a burger with lettuce and onion rings, or on the meanest Asian salad ever (recipe to come!).

Cucumber-Apple Fresh Pickle

Cucumber-Apple Fresh Pickles

Ingredients:

– 1 cucumber (Japanese, Kirby, or just any old sort!)
– 2 tsp kosher or sea salt
– 1 apple (any crisp and sweet variety, like Fuji or Gala)
– 1/2 cup water
– 1/3 cup apple cider vinegar (or rice vinegar)
– 2 tbsp very thin matchsticks of peeled ginger
– 1/4 sugar
– a generous pinch or two of  crushed red pepper flakes

Instructions:

1. Slice cucumbers crosswise 1/8 inch thick and toss with sea salt. Let stand 30 minutes, then rinse and squeeze out excess liquid with your hands. Note: Don’t worry too much about squeezing out all of the liquid — you end up pouring more water over the mixture anyway.

2. Halve apple half lengthwise and cut out core. With a mandoline or sharp knife, slice crosswise 1/8 inch thick, then halve the slices.

3. Toss apple with cucumbers and remaining ingredients and place in a 4-cup Ball jar (or equivalent-sized container). Marinate, refrigerated, for 1 day (give or take).

Enjoy! And don’t miss the upcoming recipe for Erin’s Asian Salad – there’s sriracha involved!

Note: This recipe is based off a recipe from Alexandra Cooks. She is awesome. So is her recipe. I just made some tweaks to simplify it.

Swiss Chard with Lentils and Feta

As some of you might know, the other day I was given basically all the greens ever grown. My friends’ garden was on hyper-alert, and before I knew it I had an entire cooler filled with greens. Among this plentiful produce was at least 3lbs of swiss chard. I have already taken care of using up the parsley and mint and blanching and freezing the 3lbs of kale (saved to make this soup later!) to clear out some room in the fridge for my poor roommates. But even so, the fridge is still overflowing with leaves.

So, on to step 3 – take out the chard!

Chard

Isn’t it pretty?

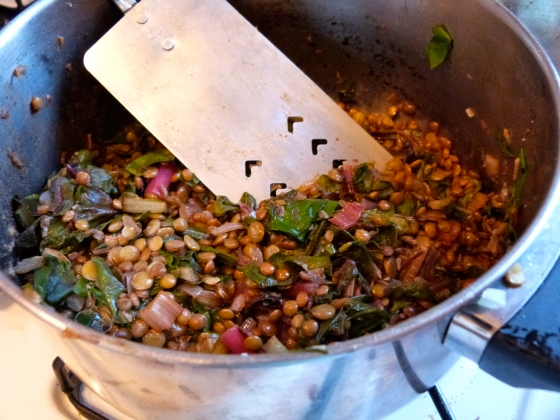
Swiss Chard with Lentils and Feta

Ingredients:

– 2 tablespoons olive oil
– 1/2 cup small-dice yellow onion (from about 1/2 medium onion)
– 2 medium garlic cloves, finely chopped
– 1 cup brown or green lentils
– 2 cups water
– 12 oz Swiss chard (about 1 bunch)
– 3/4 tsp kosher salt, plus more as needed
– 1/4 tsp freshly ground black pepper, plus more for seasoning
– 4 tsp red wine vinegar or 6 tsp balsamic vinegar
– 1/2 cup crumbled feta cheese

Instructions

  1. Heat 1 tablespoon of the oil in a medium saucepan over medium heat until shimmering. Add the onion and garlic, and 1/4 tsp salt and pepper to taste. Cook, stirring occasionally, until softened, about 5 minutes.
  2. Add the lentils, stir to combine, and add the water. Increase the heat to high and bring to a simmer. Reduce the heat to low and simmer, stirring occasionally, until the lentils are just tender and the water has evaporated, about 30 minutes. Remove from the heat and set aside.
  3. Meanwhile, trim the ends from the chard stems and discard. Cut off the stems at the base of the leaves and slice the stems crosswise into 1/4-inch pieces. Place in a small bowl and set aside. Stack the leaves, cut them in half lengthwise, then coarsely chop into bite-sized pieces; set aside in another bowl.
  4. Heat the remaining tablespoon of oil in a large frying or straight-sided pan over medium-high heat until shimmering. Add the reserved chard stems, season with a dash of salt and pepper, and cook, stirring occasionally, until softened, about 5 minutes.
  5. Add the chopped chard leaves, 1/2 tsp salt, and 1/4 tsp pepper and cook, stirring occasionally, until wilted, about 2 minutes. Stir in the red wine vinegar and reserved lentil mixture until evenly combined. Remove from the heat and allow to cool slightly, about 3 minutes.
  6. If serving immediately, keep feta separate and allow diners to sprinkle it individually, so that the cheese doesn’t melt and turn runny. If serving chilled, refrigerate for at least 20 minutes before stirring in feta.

Swiss Chard with Lentils and Feta


Swiss Chard with Lentils and Feta

Lemon-Cranberry Quinoa Tabbouleh, and Erin Gets the Green(s).

Summer has finally come to Chicago, having shamelessly cut Spring in line. Chicago Spring is pretty weak-ass and didn’t even try to fight for her place in line, so I guess we’ll have to wait until next year to see her come around. Maybe she’ll work on her left-hook over this year.

With the summer has come all of the fresh fruits and vegetables, and it is glorious. My best friend’s parents have a garden plot, and this week were suddenly up to their ears in produce. When they asked if I wanted any I jumped on the offer, but I could not have expected what showed up at my door – an entire cooler full of greens. Gobs and gobs of greens. After unpacking the bounty, this is what I ended up with in my refrigerator:

– 3 lbs of kale
– 3 lbs of swiss chard
– 3 varieties of lettuce
– 1 bunch of cilantro
– 1 bunch of mint
– 1 bunch of parsley

In other words, I was now up to my ears in greens too. In order to not evict my roommates from their share of fridge space, I knew I needed to get that situation under control.

Step 1: Take out both the mint and the parsley in one fell swoop. In other words, make tabbouleh.

.          .          .

Lemon-Cranberry Quinoa Tabbouleh

Lemon-Cranberry Quinoa TabboulehIngredients:

– 3/4 cup quinoa
– 1/4 cup olive oil
– 3 tbsp of lemon juice
– 1/2 tsp salt
– 1/4 tsp cumin
– a pinch or two of cinnamon
– 1 bunch fresh parlsey
– 1 bunch fresh mint
– 1 cup dried cranberries

Instructions:

1) Cook quinoa as directed on package.

2) Meanwhile, rinse and chop parsley and mint, and toss together in a medium-sized mixing bowl.

3) Once the quinoa is cooked and allowed to cool, add olive oil, lemon, salt, and spices to the pot and toss with a fork.

4) Stir quinoa and cranberries into the herbs, and refrigerate until ready to serve.

.          .          .

Step 2: Blanch and freeze the kale. This is an awesome way to maximize fridge space, and to preserve produce for later use. Three pounds of kale cooks down to two small ziploc bags, individually packaged for  instant use when I want to make my favorite soup – Portuguese Kale, Ham, and Potato Soup.

Stay tuned for Step 3 – Swiss Chard with Lentils and Feta Cheese. Yum!

La Bête Noir (Sinful Flourless Chocolate Torte)

This recipe was my first attempt at a flourless chocolate cake, and my reason for picking this recipe via Simply So Good was simple: it had a lot of pictures. Fun fact about me, in general my philosophy on recipes is like Captain Barbosa’s on The Pirate’s Code:

Barbosa

Obviously, this philosophy doesn’t work so well with baking. Baking is more of an exact art, and some people love it for that. I don’t. So, venturing into uncharted baking waters (forgive the continued pirate puns) is a frightening time for me. When I found this recipe for La Bête Noir my fears were slightly assuaged. The step-by-step instructions, with matching photos, make this one a fail-safe for any amateur baker like myself.

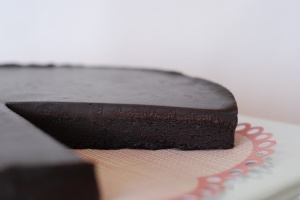
Sinful Flourless Chocolate TorteLa Bête Noir was as beastly as it sounds, and was a hit at our Passover Seder (because it is flour-less, it is Passover-safe!). More importantly it was a hit with my mother, whose birthday was the real occasion for trying my hand at baking a torte. Happy Birthday, Mom!

“La Bête Noir”

Flourless Chocolate Torte

(Click here for the link to the original recipe, with much more detailed instructions and photos.)

Ingredients

Torte

1 cup water
3/4 cup sugar
9 tablespoons unsalted butter, diced
18 ounces bittersweet or semisweet chocolate, chopped*
6 large eggs

* The better-quality your chocolate is, the better your cake will be. I used Ghirardelli 60% cacao chocolate chips. DON’T use unsweetened chocolate.

Ganache

1 cup heavy whipping cream
8 ounces bittersweet or semisweet chocolate, chopped

Instructions

Torte

1) Preheat oven to 350°F. Butter 10-inch-diameter springform pan, top, bottom, and sides. Cut a round of parchment paper to the size of the springform pan, using the pan as a stencil. Line bottom of pan with parchment round; butter parchment. Wrap 3 layers of heavy-duty foil around outside of pan, bringing foil to top of rim.

2) Combine 1 cup water and 3/4 cup sugar in small saucepan. Bring to boil over medium heat, stirring until sugar dissolves. Simmer 5 minutes. Remove from heat.

3) Melt butter in large saucepan over low heat. Add chocolate and whisk until smooth. Whisk sugar syrup into chocolate; cool slightly. Add eggs to chocolate mixture and whisk until well blended. Pour batter into prepared pan.

4) Place cake pan in large roasting pan (I used a turkey roasting pan). Add enough hot water to roasting pan to come halfway up sides of cake pan. (The cake pan will probably float a little; don’t worry.)

5) Bake cake until center no longer moves when pan is gently shaken, about 50 minutes. Remove from water bath; transfer to rack. Cool completely in pan.

Ganache

1) Bring whipping cream to a simmer in small saucepan over medium heat. Remove from heat. Add chocolate and whisk until smooth.

2) Pour over top of cake still in pan. Gently shake pan to distribute ganache evenly over top of cake. Refrigerate cake in pan until ganache is set, about 2 hours.

Scrumptious Seder Apple Cake

Speaking of Passover, my contribution to the Seder meal this year was dessert. And considering the fact that my mother’s birthday was the day before, I must admit that I felt the pressure to deliver!

I did quite a bit of research into Seder-safe dessert options, and after hearing horror stories of matzo-meal cake disasters I was rather apprehensive about risking all on a cake made essentially out of cracker crumbs.

So I didn’t. Instead, I made two cakes. One was an apple cake (made with the feared matzo-meal!), and the other was an absolutely sinful flourless chocolate torte. (That one was in honor of my mother; chocolate is pretty much her favorite thing after my father. And yoga. Her favorite thing after Dad and yoga.)

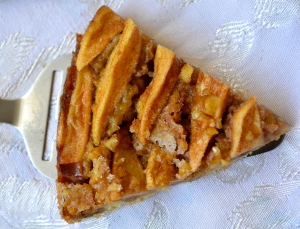
Passover Apple Cake

Both were winners…and I have now been locked in as dessert-maker for all future seders. And matzo-meal isn’t as scary as it sounds! You can buy it in the store, or make your own by simply throwing some broken pieces of matzo bread in a food processor and pulsing until ground into fine crumbs (ie. about the size of breadcrumbs you’d use for fried chicken).

Passover Apple Cake

via The Sugarcoated Life

Ingredients

Nonstick cooking spray
1/2 cup coarsely chopped walnuts or pecans
1 1/2 cups sugar (total)
3/4 teaspoon ground cinnamon
3/4 teaspoon freshly ground nutmeg
3/4 teaspoon mace
3/4 teaspoon ground ginger
3 large eggs
1/3 cup vegetable oil, plus more for baking dish
3/4 cup matzo cake meal
5 medium apples*, peeled, cored, and thinly sliced

* I used Pink Lady, but any crisp, medium-tart apple will do. I wouldn’t recommend Granny Smith, unless you like your cakes sour. (You could try Crispin, Golden Delicious, Honeycrisp, for example.)

Instructions

  1. Preheat oven to 350 degrees with a rack set in the center. Lightly spray an 8″ springform or square glass baking dish with cooking spray; set aside.
  2. Mix together nuts, half of the sugar (3/4 cup), and spices in a medium bowl; set aside.
  3. Beat eggs on medium speed until well combined. Gradually beat in remaining 3/4 cup sugar,  until mixture is thick and foamy. With the mixer running, slowly pour in oil and blend. With a spoon stir in matzo meal.
  4. Pour half of the batter into prepared cake pan. Layer half of the apples and sprinkle half of the nut-sugar mixture. Pour over remaining batter and top with remaining apples; press the apples down a bit so that you can see the batter rising up through the cracks. Sprinkle over the remaining nut-sugar mixture.
  5. Transfer cake to oven and bake until the sides of the cake pull away from the baking dish very slightly and topping begins to caramelize, about 1 hour and 15 minutes. Remove cake from oven and let stand for at least 1 hour before serving. (This is a good recipe to make a day or two beforehand, because the flavors of the spices strengthen with time.)

Groundnut Soup (Sierra Leonean Peanut Curry)

P1020684_4_2

I learned this recipe when I lived in Sierra Leone, and it quickly became a favorite. It is also a very nostalgic one for me, which was a bit of a problem when I made it this time around because the temperature margin between the weather there and here in Chicago is depressingly massive. (Damn you, Polar Plunge!)

This recipe also became an instant member of the Emergency Recipe list – the exclusive list of recipes that get me through The Dark Days of the Empty Refrigerator. (Be honest, we all get busy and/or lazy, and it happens.) All of the ingredients are basic and easy to keep in stock – you probably have them all in your pantry right now. Even the chicken isn’t an essential element – because of the peanut butter you’ll still get your protein serving.

P1050682

Ingredients:

–   2 chicken breasts, cut into bite-size pieces
–   1 tbsp olive oil
–   1 large onion, finely chopped
vegetables as desired/available (carrot, celery, etc.)
–   4 tbsp tomato paste
–   2-3 cups water or chicken broth (depending on whether or not you added veggies)
–   ½-¾ cups peanut butter
–   ½-1 tsp cayenne

Instructions:

P1050692

1)   Prepare white rice separately.

2)   Fry chicken in the bottom of a medium-sized pan in 1 tbsp of olive oil.

3)   Once cooked (or mostly-cooked), add onions and any vegetables that you are throwing in, and fry briefly with the chicken.

P10507044)   Add the water or chicken broth and bring to a boil. Reduce to a simmer and add tomato paste, peanut butter, and cayenne pepper.

5)   Simmer until vegetables are tender, or if you didn’t add any, until flavors have melded.

6)   Serve over rice.

Enjoy!

P1050707